NOTE: The following steps are for the 'normal' user who doesn't have special needs.
Preparing everything
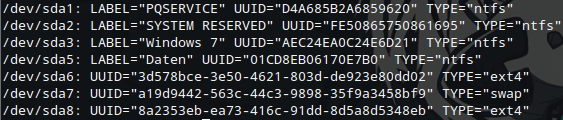
First, you'll have to find out which file-system your partition has. To do so, open up the terminal, and paste this command:
sudo blkid
What you will see are all your partitions. You can see their name on the right (LABEL='XY'), and what you need, the file-system, on the left. It should be something like this: /dev/sdxx.
You will also need to know how your partition is formatted. You see this after TYPE= .
sudo scratch-text-editor
Now, open up the file fstab in /etc.What you will see are the partitions that are automatically mounted when you start your computer.
NOTE: Be careful in the next step!
The main part
The only part we need from this file is marked in red here.
From here write down your file-system (the /dev/sdxx-Thing). In our example, it is /dev/sda5.
Now, in <mount point> we have to type in the mount point of our partition. Here, you'll have to type in /media/Name_of_Your_Partition.
Don't know the name? Open up Files and on the left, you will see all of your partitions. Write the name of your partition after /media. Is it a CD-ROM Drive? Type in /media/cdrom.
So in our case, it is Daten. So we will type /media/Daten there.

sudo blkid
In our case, the file system is NTFSNext entry: <options>. Options contains information regarding who is allowed to read this partition, who the owner is, etc. Normally all you write here is defaults. (Look here if you have special needs.)
Now, in <dump> write 0. (Find more about it here if you you're using the Backup program "dump".)
And, finally, in <pass> type 2.
That's it. Reboot your system and it should be working.
Problems? Let us know what went wrong in the comments!


